Saturday, August 24, 2013

My Finished Classroom (Finally!!)

Happy Saturday, everyone!  I am so excited to share my finished classroom with you!  It was mostly finished about a week ago, but I still had a few things to get just right, so I waited to share until today. 
Here's how it looked when I got started:
 
And here's how it looks now (the view from the back door):
And from the opposite corner:
Here's how the front wall ended up:
Here's a close-up of what's on the right side of the board:
And here's where I write our objectives and tasks for the day (on the left side of the board):
I cut these titles out with my silhouette.  I used KG Always a Good Time font by Kimberly Geswein Fonts)
Here is the inside of my "front"door:
I just love these posters!  I purchased these posters from SpanishPlans on TPT and changed the font.  My students love these posters!

In the back corner, next to the "front" door, I have the flags displayed, and our mascot, the blue iguana, frequently hangs out on the flagpole (although sometimes he spends class with a student).  My high schoolers love our iguana and I have various students that will beg to hold the iguana for the class period.
Finally, on my desk I have my lesson planner/calendar.  I used a small binder and it has my calendar first, followed by my lesson plans.
Whew!  What do you think?  I am so ready to welcome my students on Monday morning!  
post signature

Tuesday, August 20, 2013

How I organize my Sub Binder

Good evening everyone!  I've been really busy this week with in-service meetings and making sure everything is ready for my students come Monday.  One of the things I've been working on was my Sub Binder.  Our school requires the use of a Sub Binder, and I wanted mine to be functional, but also pretty :)  I made these dividers, plus a cover page to use this year. I love that each cover page acts as a mini table of contents for each section, so hopefully my sub won't have any problem locating anything in my binder.  Click on the picture below to download my editable sub binder pages in PowerPoint form.
How do you organize for your subs?
 post signature

Saturday, August 17, 2013

TpT Back to School Sale!

I just wanted to stop in and remind everyone that the Teachers Pay Teachers Back to School Sale is today and tomorrow.  Everything in my store is 28% off when you use the promo code "BTS13" at checkout.  
image by the 3am teacher
I have had my eye on a few things for a while.  I'm thinking about buying:
from The Enlightened Elephant
also from The Enlightened Elephant
from Martina Bex
from Danielle Knight
from Glitter Meets Glue Designs
from Pink Cat Studio
What are you planning on buying?
post signature

Friday, August 16, 2013

How I organize myself for the week

Happy Friday, everyone!  Today was my first day back since I had surgery last November, and it was so nice to see everyone again!  I am ridiculously excited to begin another year at such a great school with such awesome people.
Today I want to share how I organize my classes for the week.  I think I got this idea from Ladybug's Teacher Files a while back.  It's really simple, yet effective!  I bought 5 of these from Walmart:
12-quart Sterilite Dish Bin
and printed and cut out the days of the week titles using my Silhouette and Mod-Podged them on (I know most people say there's bleeding or smudging when Mod-Podging over printed items, but for some reason that didn't happen in this case).  In order to get them to all fit on the table, I took some old cube shelves I had lying around:
and zipties and made the shelf.  Here's what I ended up with:
What I love about these bins is how big they are.  I'm planning on keeping the coming week's copies in the bottom right spot and organizing everything into the correct bin on Fridays.  I love that they will hold copies, manipulatives, games, papers to return, whatever I want.  I just pull out the day's bin and everything I need for that day is in there.  This system saves me a lot of prep during the week and it's yet another way to reinforce the days of the week with my students.

How do you organize your copies?
post signature

Tuesday, August 13, 2013

Three Quick, Easy and (Mostly) Free Ways to Randomly Group Your Students

Being able to quickly group your students is very helpful as a teacher.  I have three quick and (mostly) free ways to group them.  
This first set of grouping cards I use when I want to pair my students up.  I found these free grouping cards on Teachers Pay Teachers from Making it as a Middle School Teacher and I love them!
Another great way to group kids is by using cut up paint swatches, and the students have to find the other colors in their "family".  I got this idea from Fast Times of a Middle School Math Teacher, and headed straight for Home Depot.  I asked the lady in the paint section if I could take a few cards, and she let me take as many as I wanted (I only took 8: pink, red, orange, yellow, green, blue, purple, and gray - of course I picked the cards that most closely matched my classroom colors, because I'm a little neurotic...)

The third easy grouping idea is to use a regular deck of cards.  I bought a new deck for $1 at Walmart.  What I love about playing cards, is you can split the class in half (red vs black), into four groups (each suit is its own group), you can group by fours (all kings, all queens, etc), and so on.  There are tons of different ways to group using playing cards.

How do you group your students?
post signature

Sunday, August 11, 2013

My Monday Made It on Sunday

Happy Sunday, everyone!
I'm excited to link up again with Tara for Monday Made It!
I don't have nearly as much to share with y'all as last time, but I'm still pretty proud of my Made-Its this week.
I already shared my blank bulletin boards with you here, and here's how they turned out:
the left side (top is my color posters and bottom is an "about me" mini-board.  My students love to look at this, especially the pictures)
the whole board (for now, the right half is only announcements, but that will probably be changed out every month or so for a themed board)
I jumped on the "Copy, Grade, File" bandwagon.  There are so many cute options out there, but mine had to match my other drawers (of course!).  Click on the picture above if you would like to download my version.
I shared my manipulatives drawers a few weeks back and I wanted to show you how everything turned out.
Since I'm only teaching level one, I decided to only keep my Spanish 1 resources in the drawers.  If/when I teach level two again, I'll probably buy more drawers so that I can keep each level separate.
I'm in love with my new calendar!  It's velcro so it's easy to switch out.  I glued the days of the week to the poster board, as well as the border, and then laminated it.  I used the black velcro dots to hold each card.  I also made some other cards (exam, no school, early out, etc) to hang when appropriate.  Each month card has a matching piece of clip art (all clip art was purchased through the Silhouette Design Studio software).  I'm really excited to get to use this!
My last Made-It is a set of posters I made that correspond to the first set of vocabulary we study, Classroom Survival Phrases.  I used a chevron background (shocking, I know!) in my same bright colors so it coordinates with everything else in my room.  I'm planning on covering these with butcher block paper when they take their quiz over them.  I'm not sure how long I will keep these up, since I really like how they brighten up that wall.

I'm getting so excited to start the school year and meet all of my kids this year!  Our first day of in-service is this Friday, so I still have a few days off to tweak my set-up, finish up my plans, and relax before the big day.  I'm sure a few of you start back tomorrow, so good luck!  For those of you who still have a little more time, what do you have left to finish?
post signature

Thursday, August 8, 2013

My Teacher Toolbox

Hey everyone!  Yesterday, I said I would share a picture of my teacher toolbox, using my new labels.  This is the same toolbox I used last year, and I had already spray painted it pink (the paint job has held up very well!).  Without further ado, here she is:
I am so happy with how my new labels turned out and how well they match my manipulatives drawers.
What do you think?
post signature

Wednesday, August 7, 2013

An Organizational Freebie - Teacher Toolbox Labels

Good evening everyone!  I'm popping in really quickly to share my newest freebie - a set of Teacher Toolbox Labels.  I made a toolbox last year and loved it, but I decided it was time to update it so it matches my manipulatives storage as well as my Copy, Grade, File drawers.  I popped out these little labels, and I'm going to fix up my toolbox tomorrow, so I'll post some pictures then.
Click on the picture to be taken to the listing on my TpT store where you can download the file.
Do you have a Teacher Toolbox?
post signature

Monday, August 5, 2013

Monday Made It: More Classroom Made-Its and a Freebie

Good afternoon!
I'm really excited to share the progress I've made in my classroom and link up with 4th Grade Frolics for another Monday Made It.
Here are my before shots:
This is the view from the back door of my classroom.
This is the view from my desk corner.  The door in the back next to the white cabinet is the back door.
As you can see, my room is pretty small (32'x24'), especially considering I need 30 desks.  It also feels a lot smaller thanks to the not-so-lovely paneling.
Now, I'm no where near finished, but I have a few projects and pictures to share until I'm able to share the finished room.
This first one the view of the front of my classroom (the long wall with one whiteboard).  This is the only wall that is finished.
I love how hanging borders around the whiteboard really warms up the room, and the owls are in my classroom colors.
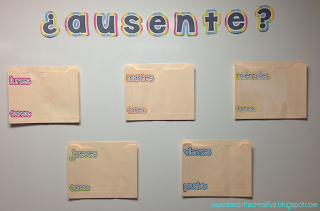
This is one of my extra whiteboards on the right-hand side of my classroom, right when the students walk in the door.  I used file pockets and labeled them with cut-outs from my silhouette.  Every day has a spot for the homework except for Fridays, because I don't assign homework over the weekends.  The file pockets are laminated so that I can write on them with dry-erase markers.  I place a few extra copies of that day's handouts in the appropriate pocket, and the students know to check this wall before seeing me when they return from an absence.  This is the second year I've used this system and it works very well for me.  I usually label the files every Friday after school (or I let one of my students do it, since they always beg me).  The folders I used last year were labeled with a Sharpie and they looked fine, but they weren't pretty enough so of course I had to revamp them to match everything else in my room.
 
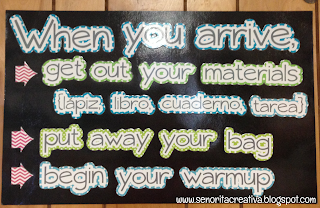
 This poster hangs to the right of my main whiteboard at the front of the room, as you can see in the picture above.  I used to have to remind my kids all the time about the beginning of class routine, but this poster really helps them remember what to do when they arrive.  I also made this with my silhouette (I promise they aren't paying me to talk about their machine, I just love it and think it's perfect for teachers, and they offer a 20% discount to teachers on their site!).
 So technically I made this last year, but I didn't have a blog then to share it, so I'm going to pretend that I just made it :)  This hangs above my whiteboard, and I also made it with my silhouette.  You can download a similar banner from me here.
I'm trying out boggle this year with my students as an activity for early finishers.  I made this myself using (surprise!) my silhouette.  I'm planning on using Señora Dentlinger's boggle form (free on her TpT store!), and you can learn more about how she plays it with her Spanish students at this blog post (While you're there, check out her other posts.  She has some great ideas!). 
 I got this idea from Miss Squirrels at Going Nutty with Miss Squirrels.  She uses hers for extras, but I'm planning on having the students just take the colors they need and put them back when they're finished (wishful thinking?).
 These signs hang below the daily agenda.  Every day when we go over the warmup, we also go over the date, the weather, and if it's anyone's birthday, they tell me so they go on the birthday sign.  I used to give homework passes for birthdays, but it was really hard to keep up with because there are so many kids coming in and out through the year due to the military base.  This way, they still get to feel special, they still get their pass, but it's much less for me to keep up with.
 
 This is my last made-it for today.  We are strongly encouraged to post our classroom rules for the students to see but I try to avoid posting stuff in English when possible (except for a few quotes that would be really hard for them to understand), so this was my solution.  If you don't speak Spanish, my rules are:
1. Be respectful.
2. Come prepared.
3. Follow directions.
4. Follow the Student Code of Conduct.
On the first day we go over the rules and what they mean.  This is a good way to activate prior knowledge ("Even if you don't speak Spanish, I bet you can figure out what most of these words are.  Who can figure out part of the first rule?" etc) and introduce them to cognates and commands, all on the first day.
The last thing I want to share is a set of color posters I made for my class.  I hung them on the bulletin board in the back of my room, but I forgot to take a picture of them.  I thought I would share them with all of y'all, since they're so bright and fun.  Just click on the picture to be taken to the posters in my TpT store, which are free.

Whew!  I've been busy, but I still have so much to do!  I can't wait to share finished photos with all of you!

Here's a few questions for you, and I would love to hear what you have to say!
How do you celebrate birthdays in your middle or high school classroom?
How do your students catch up when they return from an absence?
 post signature